Close this page
Did you ever ask yourself if Paint is as powerful as Photoshop? It does not work the same as Photoshop, but it IS almost as powerful as Photoshop.
This is a tutorial on how to do a GRADIENT OVERLAY.
Step1. Open Paint.
Step2. Hit Ctrl E. Set your width to 100 and the height to the height you want. In this case, let me use 500. Make sure pixels and colors are checked.
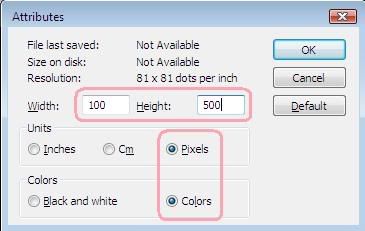
^ I am sorry about the image quality.
Step3.Draw a line across using your first chosen colour. Then use the bucket tool to colour the top-right part of your rectangle with your 1st colour. Then the bottom-left part with your second colour.
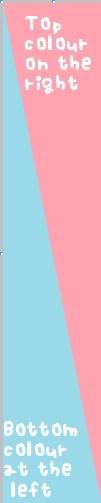
^ again sorry about the image quality.
Step4: Hit Ctrl + W on your keyboard. The Stretch and Skew Options will pop up. Set the Horizontal Sketch to 1 while the rest remain the same.
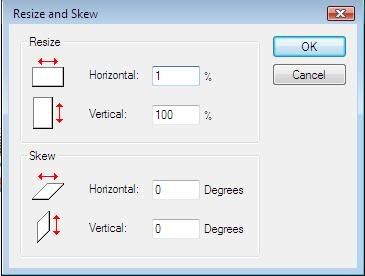
^ yes ,, the image quality.
Step5. You will see this small tiny thin gradient already. Hit Ctrl + W in your keyboard. Set the Horizontal Sketch to 500.
Step6. Do it until you think it's too big. Hit Ctrl E and set your desired Width and Height. For the blank spaces, just fill it in with those gradient overlay & colours.
If you do not understand, email simpl-e@live.com .
This is a tutorial on how to do a GRADIENT OVERLAY.
Step1. Open Paint.
Step2. Hit Ctrl E. Set your width to 100 and the height to the height you want. In this case, let me use 500. Make sure pixels and colors are checked.
^ I am sorry about the image quality.
Step3.Draw a line across using your first chosen colour. Then use the bucket tool to colour the top-right part of your rectangle with your 1st colour. Then the bottom-left part with your second colour.
^ again sorry about the image quality.
Step4: Hit Ctrl + W on your keyboard. The Stretch and Skew Options will pop up. Set the Horizontal Sketch to 1 while the rest remain the same.
^ yes ,, the image quality.
Step5. You will see this small tiny thin gradient already. Hit Ctrl + W in your keyboard. Set the Horizontal Sketch to 500.
Step6. Do it until you think it's too big. Hit Ctrl E and set your desired Width and Height. For the blank spaces, just fill it in with those gradient overlay & colours.
If you do not understand, email simpl-e@live.com .
Labels: gradient